Master Remote IoT Monitoring With SSH On Raspberry Pi & Ubuntu!
Is remote access to your Internet of Things (IoT) devices a necessity in our increasingly interconnected world? The answer is a resounding yes, as the ability to monitor and control these devices from afar has become an indispensable asset for both personal and professional applications.
This article serves as your comprehensive guide to establishing remote IoT monitoring using Secure Shell (SSH) on a Raspberry Pi, leveraging the Ubuntu operating system. We will dissect the process, ensuring that you gain a firm grasp on seamless data access and control over your devices. We'll navigate through the intricacies of setting up this system, focusing specifically on the Raspberry Pi, Ubuntu, and the integration possibilities with Windows. Our aim is to equip you with the knowledge and tools to remotely manage your IoT applications securely and efficiently. Imagine a scenario where you can combine remote control functionalities with real-time monitoring capabilities, all accessible through a single, centralized dashboard. This capability is within your reach.
To provide further context and understanding, a simplified table is presented below. It summarizes the core components and essential aspects of remote IoT monitoring using SSH on a Raspberry Pi with Ubuntu. This information is crafted for ease of integration into your workflow and to give you a clear snapshot of the topic. For in-depth exploration of SSH security and its practical applications, you can refer to an external resource dedicated to secure configuration (Note: Replace this link with a relevant and authoritative source on SSH security). This enhances your understanding by providing a link to external resources, allowing for a more in-depth understanding.
- Kevin Whately Stroke Awareness His Impact On Fans Latest News
- Best Kannada Movies Of 2023 Top Picks Where To Watch
| Category | Details |
|---|---|
| Technology Used | Secure Shell (SSH) |
| Hardware Platform | Raspberry Pi |
| Operating System | Ubuntu (on Raspberry Pi) |
| Primary Functionality | Remote Monitoring and Control of IoT Devices |
| Key Benefits | Secure Data Transfer, Remote Command Execution, File Management, Device Monitoring |
| Security Features | Encrypted Communication, Authentication Mechanisms (e.g., SSH Keys) |
| Access Method | SSH Client (e.g., Terminal on Linux/macOS, PuTTY on Windows) |
| Monitoring Capabilities | CPU Usage, Memory Usage, Network Usage, Custom Metrics (based on IoT Data) |
The essence of this system lies in the power of SSH. SSH, or Secure Shell, is more than just a remote access protocol; it's the backbone of secure communication in our context. By leveraging SSH, users gain the ability to remotely access their Raspberry Pi, execute commands, transfer files, and manage IoT applications with a high degree of security. This is achieved through encryption, which keeps your data safe from prying eyes as it travels between your Raspberry Pi and your devices.
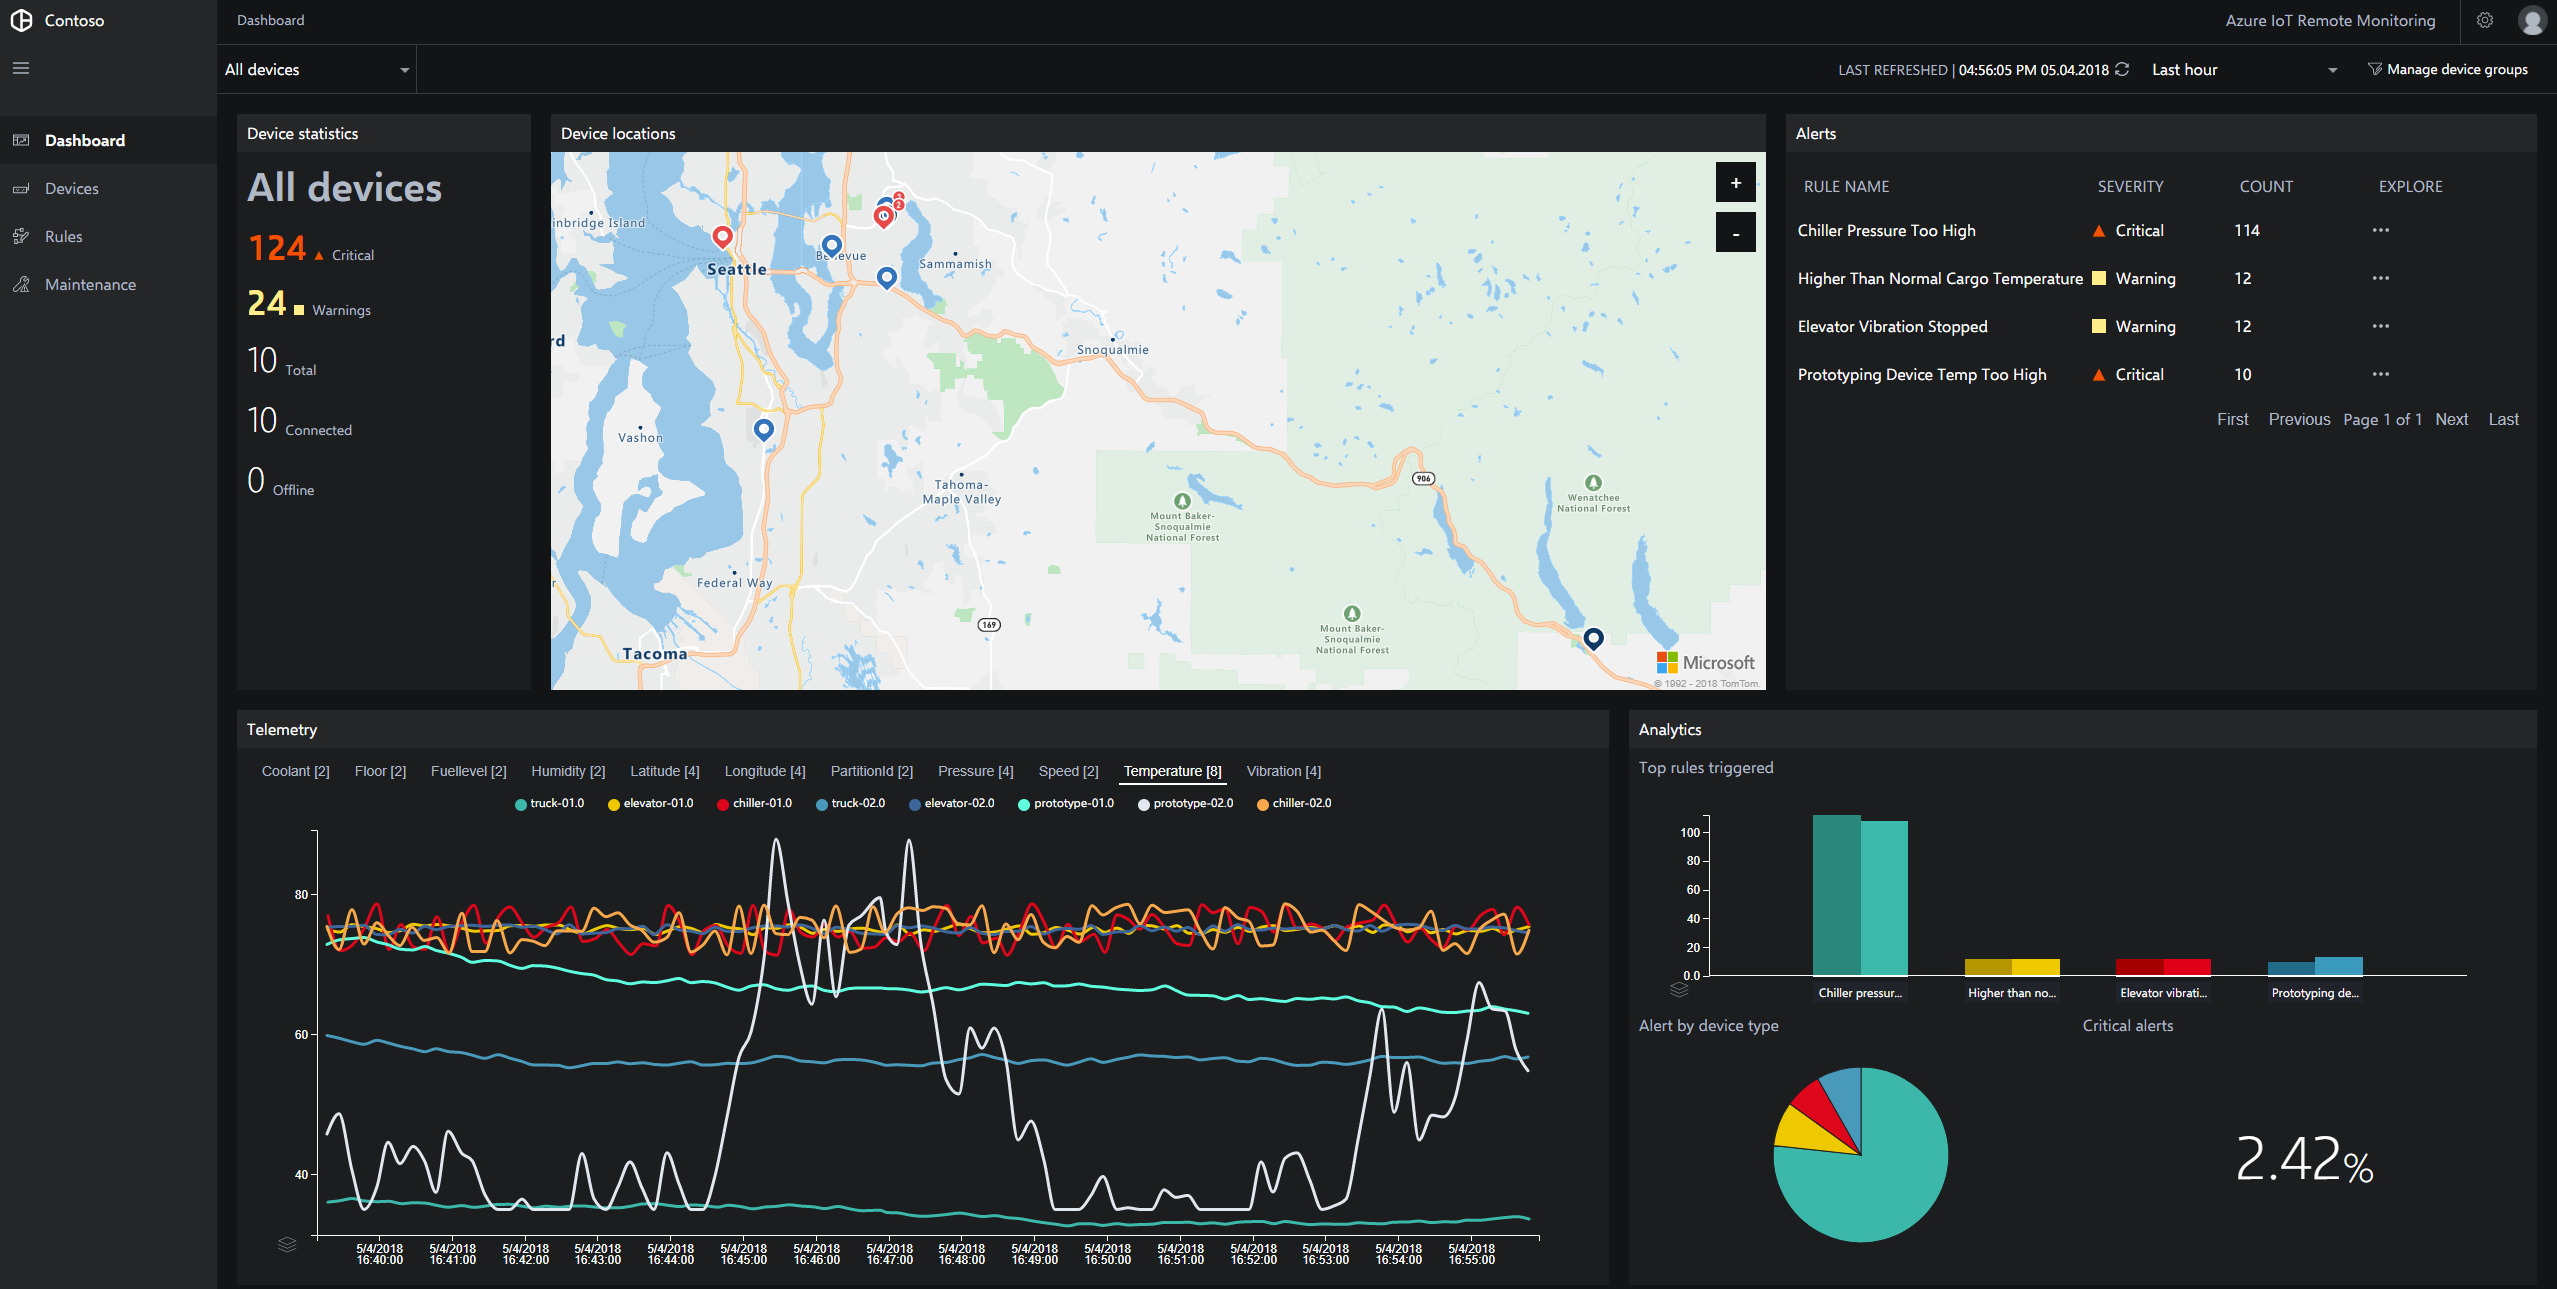
In today's digital age, the significance of remote IoT monitoring cannot be overstated. It's rapidly becoming an indispensable aspect for both businesses and individuals. Whether you're managing a smart home setup, industrial equipment, or a network of environmental sensors, the capacity to remotely monitor these devices is vital. Think of the possibilities: getting a complete overview of all your IoT devices through a single dashboard, remotely monitoring CPU usage, memory usage, and network activity, receiving alerts based on the data your IoT devices generate, and even running batch jobs on the devices themselves. This is the power of remote IoT monitoring using SSH.
This comprehensive guide will navigate you through the detailed process of setting up remote IoT monitoring using SSH on a Raspberry Pi. Well cover every critical step, beginning with downloading the necessary software and concluding with the secure configuration of your connections. Youll have all the essential tools at your disposal to ensure a successful implementation.
- Discover Bonniealex Exclusive Content Community
- Noodlemagazine Your Guide To Noodles More Discover Now
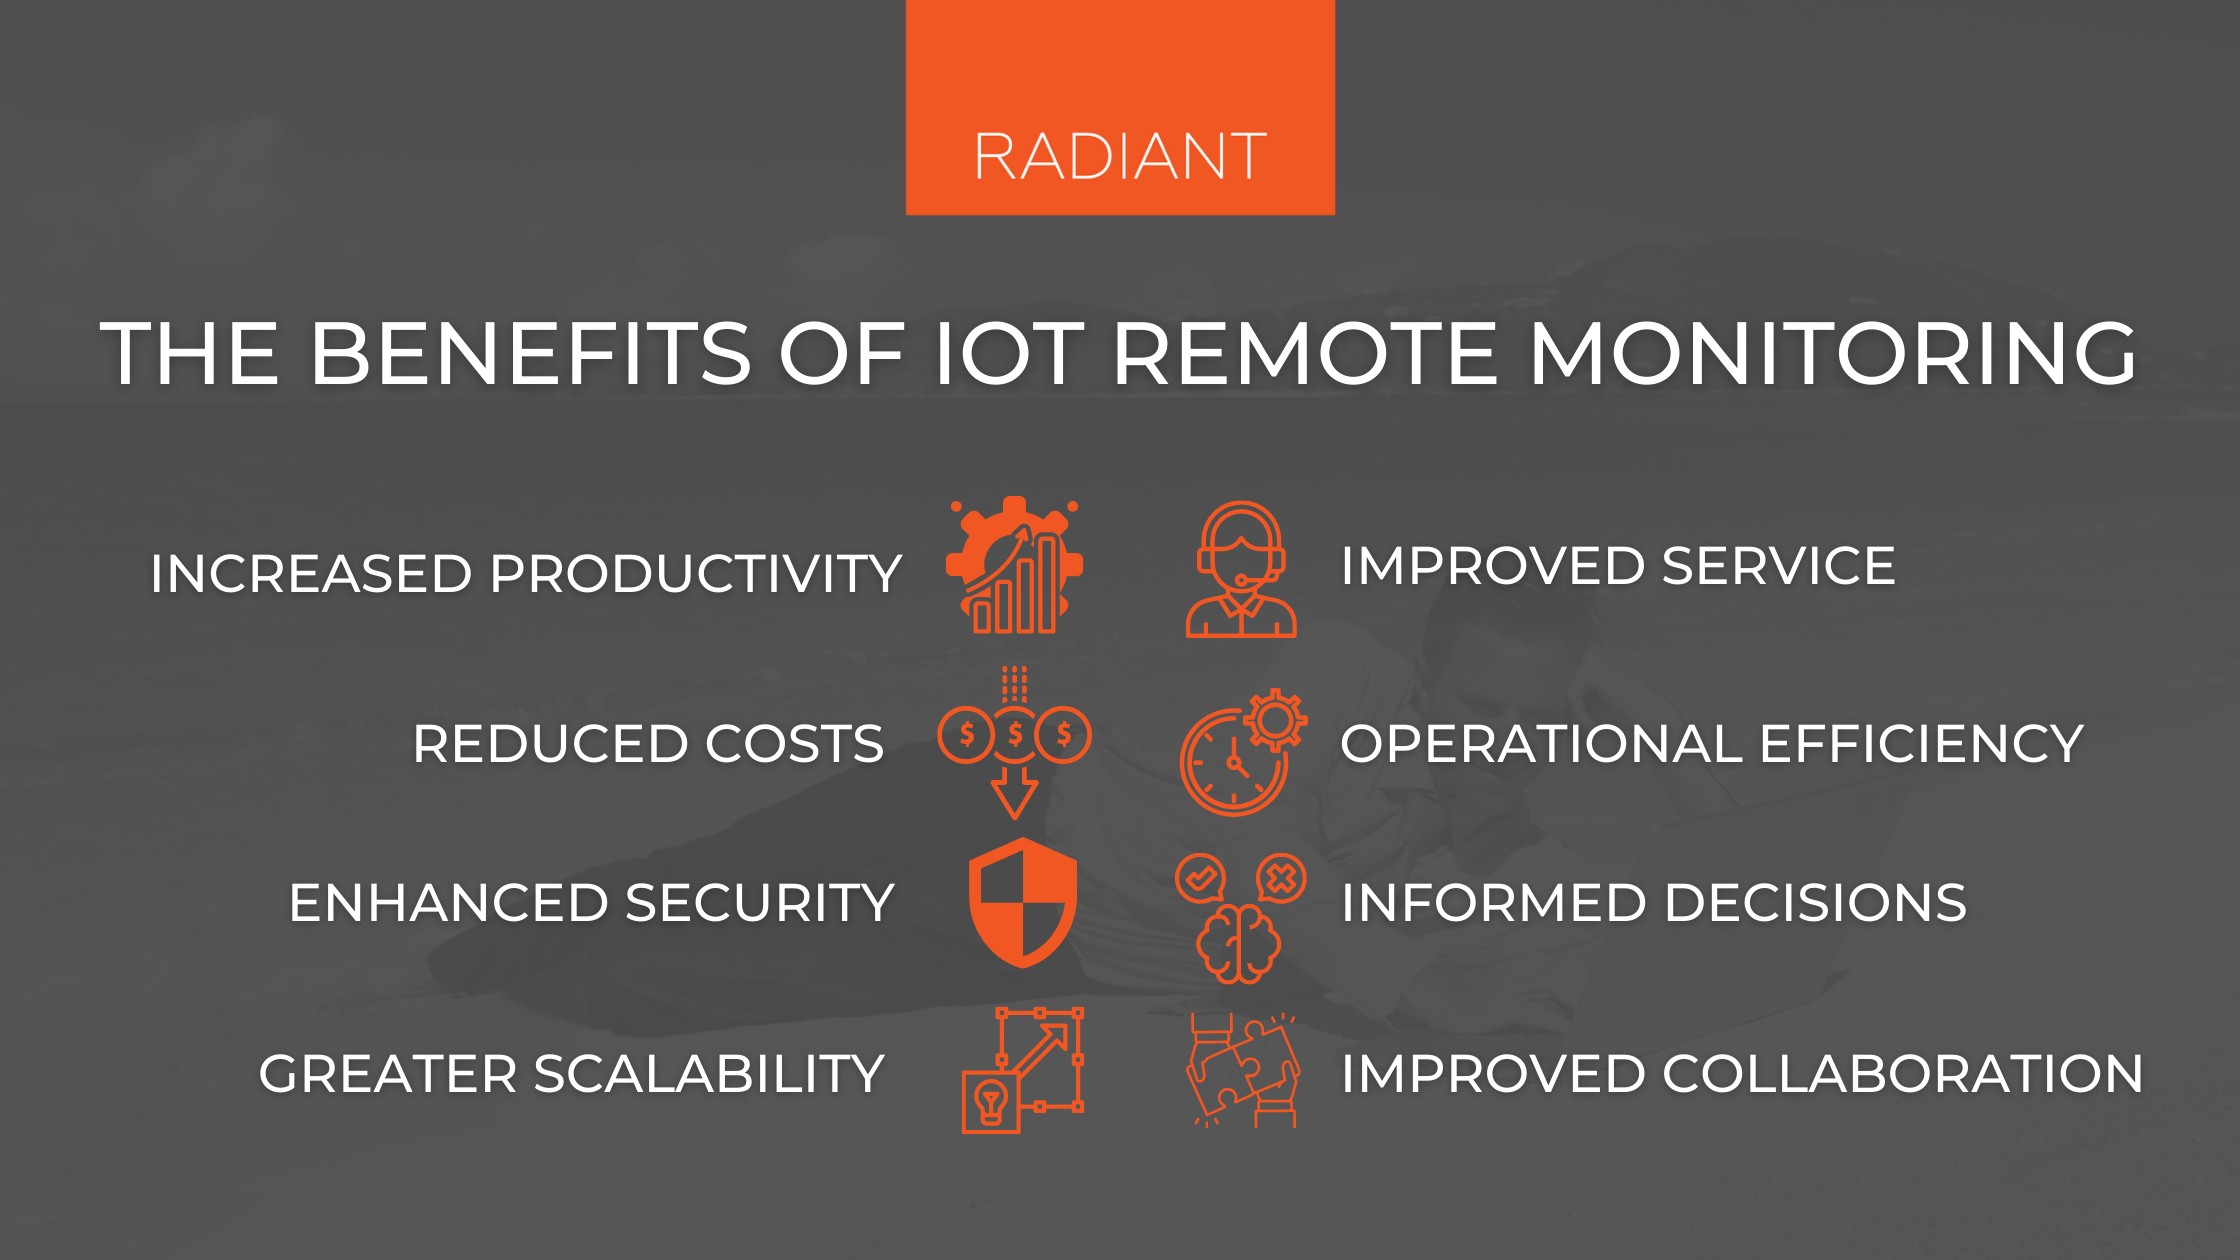
Remote IoT monitoring with SSH offers a multitude of benefits, including heightened security, enhanced efficiency, and reduced operational costs. With this setup, you gain the power to keep a watchful eye on all your devices without the need for physical presence. The use of SSH provides a secure pathway for data transmission, ensuring that your sensitive information remains protected.
This innovative method of managing and controlling devices remotely has revolutionized how we interact with smart devices. It provides seamless access and powerful data management capabilities. By following the guidelines provided in this article, you can establish a secure and efficient system tailored to meet your specific requirements.
Let's address a common question: Why is SSH perfect for remote IoT monitoring? The answer lies in its security. SSH encrypts all communication between your Raspberry Pi and your IoT devices, effectively safeguarding your data from potential threats. This encryption is the secret sauce that makes remote IoT monitoring secure and efficient. It's what allows you to remotely access your devices, execute commands, and transfer files without worrying about unauthorized access or data breaches.
As we delve into this subject, it's important to understand that this isn't merely about providing information. Instead, it's about equipping you with actionable insights and practical knowledge. Proper server configuration is crucial for maintaining secure remote IoT monitoring practices. It involves setting up user authentication, configuring firewalls, and regularly updating your system to mitigate potential vulnerabilities. Moreover, understanding the key benefits of remote IoT monitoring is vital.
Remote IoT monitoring via SSH empowers users to manage their IoT devices from virtually anywhere in the world. Whether you're an engineer, a hobbyist, or someone simply curious about how devices can be controlled remotely, this topic is definitely worth exploring. The ability to remotely access and control your devices opens up a whole new realm of possibilities, from smart home automation to industrial equipment management. It offers convenience, efficiency, and peace of mind.
For those entering the realm of remote IoT monitoring, this is an adventure that is as exciting as it is rewarding. The key to success lies in understanding the underlying technology, configuring your system correctly, and implementing robust security measures. This guide is designed to provide you with the necessary knowledge and tools to make your journey a successful one.
The journey of setting up remote IoT monitoring is more than just about technical steps; it's about understanding the broader implications and the potential. Its about recognizing how technology is changing the way we interact with our environment, whether it's in the comfort of our homes or within complex industrial settings. The convergence of remote access, security, and the ability to manage devices from anywhere in the world makes remote IoT monitoring a compelling solution.
Now, lets break down the process step by step:
- Hardware Preparation: Start with your Raspberry Pi. Ensure you have a compatible model (Raspberry Pi 3 or later is recommended) and a microSD card with a sufficient capacity (at least 16GB).
- Operating System Installation: Download the latest version of Raspberry Pi OS (formerly known as Raspbian) from the official Raspberry Pi website. Use a tool like Raspberry Pi Imager to flash the OS onto your microSD card.
- Initial Setup: Insert the microSD card into your Raspberry Pi and connect it to a monitor, keyboard, and mouse. Power on the Pi and follow the on-screen prompts to set up the initial configuration, including setting a password and configuring Wi-Fi (if you intend to use Wi-Fi).
- Enabling SSH: SSH is typically disabled by default. You'll need to enable it. You can do this through the Raspberry Pi configuration tool (
sudo raspi-config) or by creating an empty file named "ssh" in the boot partition of the microSD card before booting the Pi for the first time. - Updating the System: Once you have access to the command line, update your system by running:
sudo apt updatesudo apt upgrade
- Configuring a Static IP Address (Recommended): For reliable remote access, it's advisable to assign a static IP address to your Raspberry Pi. You can configure this in the network settings or in the
/etc/dhcpcd.conffile. - Firewall Configuration (Optional but Recommended): Set up a firewall (like UFW - Uncomplicated Firewall) to restrict access to your Raspberry Pi. This helps to enhance security.
- Port Forwarding (if applicable): If your Raspberry Pi is behind a router, you'll need to configure port forwarding on your router to allow external access to the SSH port (default is port 22).
- SSH Key Authentication (Highly Recommended): Instead of using passwords for SSH logins, set up SSH key authentication for added security. This involves generating a key pair (public and private keys) and adding the public key to the
authorized_keysfile on your Raspberry Pi. - Installing Monitoring Tools: Install tools to monitor CPU usage, memory, network traffic, etc. You can use tools like
htop,iotop,iftop, and others. - Testing the Connection: From another device (e.g., your computer), try to SSH into your Raspberry Pi using the command:
ssh pi@(replace "pi" with your username and "" with the IP address of your Raspberry Pi). - Accessing and Managing IoT Applications: Once connected via SSH, you can execute commands, transfer files, and manage your IoT applications.
With SSH, you're essentially creating a secure tunnel through which you can send commands and receive data from your Raspberry Pi. This tunnel is encrypted, protecting your information from eavesdropping. The advantage of SSH is that it's a secure and widely supported standard, making it a robust choice for remote IoT monitoring.
One of the most appealing aspects of remote monitoring is the ability to gain a complete overview of all your IoT devices through a single dashboard. This dashboard can aggregate data from various sources, providing a unified view of your system's performance. You can visualize CPU usage, memory consumption, network traffic, and other important metrics. Furthermore, you can receive alerts based on monitored IoT data, enabling you to respond quickly to any issues or anomalies.
From an efficiency standpoint, remote IoT monitoring is a game-changer. It reduces the need for physical presence, saving time and resources. Remote access empowers you to troubleshoot issues, update software, and perform maintenance tasks without having to be on-site. The reduced downtime and improved responsiveness contribute significantly to overall operational efficiency.
Remote IoT monitoring is not merely a technical convenience; it is an essential tool for businesses and individuals seeking to manage and secure their IoT devices. As technology advances and connectivity becomes more pervasive, the need for such capabilities will continue to grow. The benefits are clear: enhanced security, improved efficiency, and reduced costs. With remote IoT monitoring, you can keep a watchful eye on everything without lifting a finger.
Setting up remote IoT monitoring via SSH is an investment in your security and operational efficiency. It opens doors to new possibilities, allowing you to remotely control and manage your devices from anywhere in the world. It enables you to adapt to unforeseen circumstances, troubleshoot issues remotely, and ensure the smooth operation of your IoT ecosystem. Embracing this technology is embracing a future where your devices are always within reach and under your control. It is a powerful solution that empowers you to be in charge, no matter where you are.
In this context, the concept of "ssh download" is less about a direct download and more about the configuration and utilization of the SSH protocol, which is often pre-installed on Raspberry Pi OS. The steps involve enabling SSH and ensuring its secure configuration rather than downloading any specific software.
Properly configuring your server is pivotal to securing your remote monitoring setup. This includes establishing strong authentication methods, enabling a firewall, and regularly updating the system software. These practices are crucial to protect your devices from external threats and maintaining the integrity of your IoT system. Regular updates and security audits are equally essential in this ongoing process.
Detail Author:
- Name : Garry Paucek V
- Username : isimonis
- Email : deondre14@gmail.com
- Birthdate : 2001-02-12
- Address : 796 Rylan Highway North Ashlyport, IN 88172-5254
- Phone : (567) 419-6212
- Company : O'Conner-Goodwin
- Job : Carpet Installer
- Bio : Culpa et debitis harum eaque sint. Maxime incidunt numquam voluptatem beatae nostrum rerum. Quod doloribus voluptates in voluptatem. Molestiae provident dolores alias sed odio eos ea.
Socials
tiktok:
- url : https://tiktok.com/@treva_jacobson
- username : treva_jacobson
- bio : Suscipit hic possimus quae voluptatum officiis.
- followers : 5867
- following : 170
twitter:
- url : https://twitter.com/treva.jacobson
- username : treva.jacobson
- bio : Enim quos molestiae et nisi consequatur animi. Libero odio est et ut nemo. Totam quod quia doloremque qui. Nesciunt eum similique illo.
- followers : 2058
- following : 1672
facebook:
- url : https://facebook.com/treva.jacobson
- username : treva.jacobson
- bio : Voluptatem corporis expedita pariatur. Rerum nulla sit et fugit est.
- followers : 5686
- following : 140

 devices a necessity in our increasingly interconnected world? The answer is a resounding yes, as the ability t)